由于系统环境的一些问题,最后安装失败
这篇文章只保留过程一些笔记做参考
创建MySQL用户和组
sudo groupadd mysql
sudo useradd -r -g mysql -s /bin/false mysql
引申:
sudouseradd-r-gmysql-s/bin/falsemysql的作用
这个命令用于在Linux系统里创建一个名为mysql的特殊用户,下边来详尽解析它的各个参数和作用:
命令参数解析
为何要创建这样的用户
在Linux系统中,遵守最小权限原则,不同的服务应当使用专门的用户来运行,防止使用root用户linux系统移植嵌入式linux驱动程序设计从入门到精通,进而增加安全风险。对于MySQL服务,创建专用用户有以下益处:
隔离风险:要是MySQL服务被功击linux操作系统好吗,功击者只能获得mysql用户的权限,难以直接控制整个系统。权限控制:可以精确地设置mysql用户对文件和目录的访问权限。系统规范:符合Linux系统的管理规范linux系统移植,以便服务的管理和监控。
验证用户是否创建成功
你可以通过以下命令查看用户信息:
id mysql
# 输出示例:uid=999(mysql) gid=999(mysql) groups=999(mysql)
还可以查看用户的shell设置:
grep mysql /etc/passwd
# 输出示例:mysql:x:999:999::/home/mysql:/bin/false
二、创建安装目录
sudo mkdir -p /usr/local/mysql
sudo chown mysql:mysql /usr/local/mysql
三、安装依赖包
# Ubuntu/Debian系统
sudo apt-get install libaio1 libncurses5
# CentOS/RHEL系统
sudo yum install libaio ncurses-compat-libs
引申:sudoyuminstalllibaioncurses-compat-libs
libaio和ncurses-compat-libs是MySQL在Linux系统上运行所需的两个关键依赖库。下边为你详尽介绍这个命令的作用、适用场景以及相关注意事项。
1.命令作用
bash
sudo yum install libaio ncurses-compat-libs
此命令用于在CentOS/RHEL系统上安装MySQL运行所必需的依赖库:
2.适用系统
该命令适用于使用yum包管理器的系统,像CentOS、RHEL、Fedora(较旧版本)等。
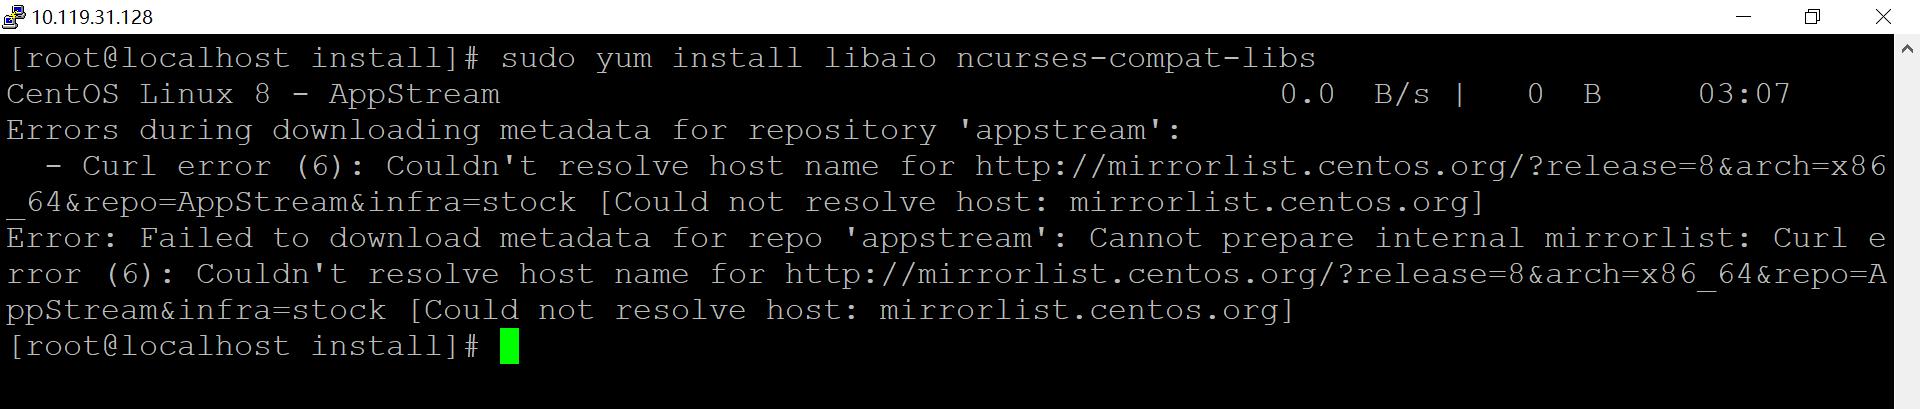
sudoyuminstalllibaioncurses-compat-libs安装失败了
从截图看,在CentOS8系统执行sudoyuminstalllibaioncurses-compat-libs安装软件包,可能因以下缘由安装失败,可按步骤排查:
一、软件源问题
CentOS8EOL(生命周期结束)
CentOS8已停止官方维护(2021年末中止支持),默认软件源失效,会造成yum未能正常获取包。
解决:
切换到CentOS官方归档源,编辑
/etc/yum.repos.d/CentOS-Linux-*.repo文件,将mirrorlist和baseurl替换为:
# AppStream 示例
[CentOS-Linux-AppStream]
name=CentOS Linux $releasever - AppStream
baseurl=http://vault.centos.org/8-stream/AppStream/$basearch/os/
gpgcheck=1
gpgkey=file:///etc/pki/rpm-gpg/RPM-GPG-KEY-centosofficial
(需替换所有CentOS-Linux-*库房,包括BaseOS、Extras等)
或改用AlmaLinux、RockyLinux的兼容源(更推荐迁移到这种CentOS取代发行版,常年更稳定)。
库房未启用
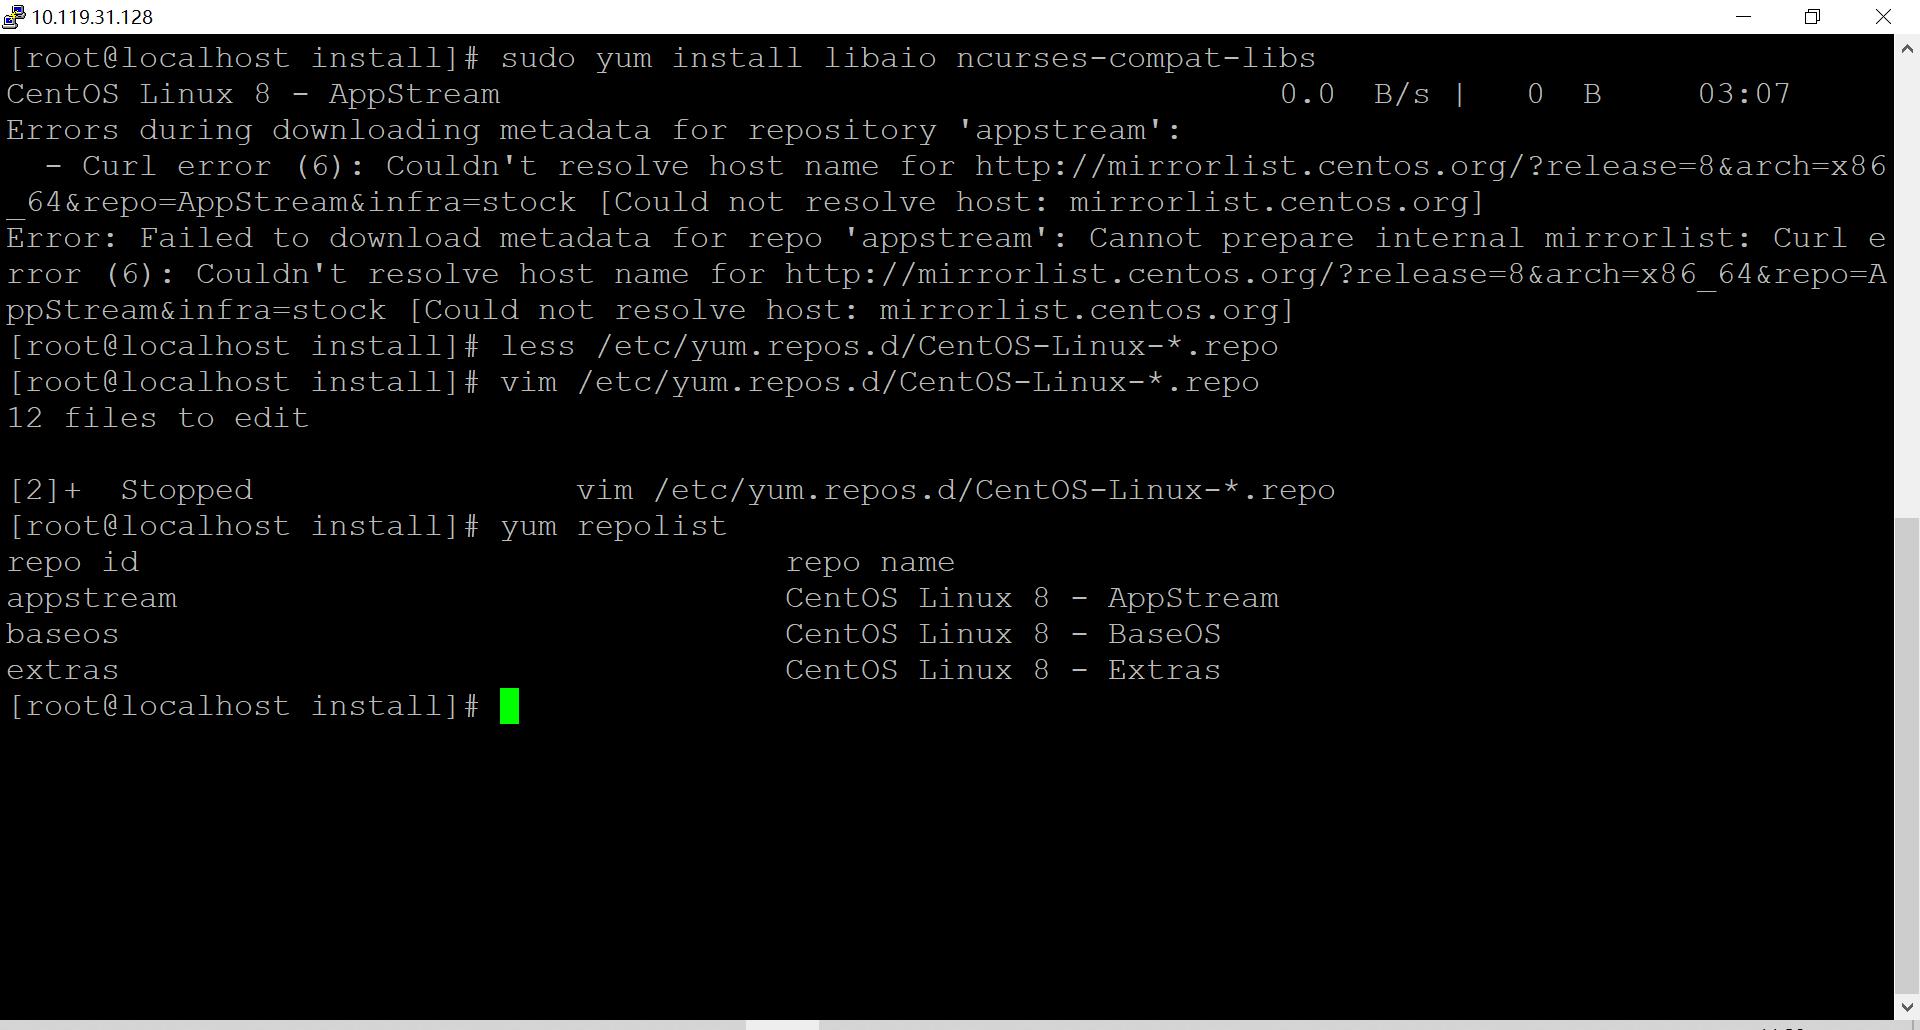
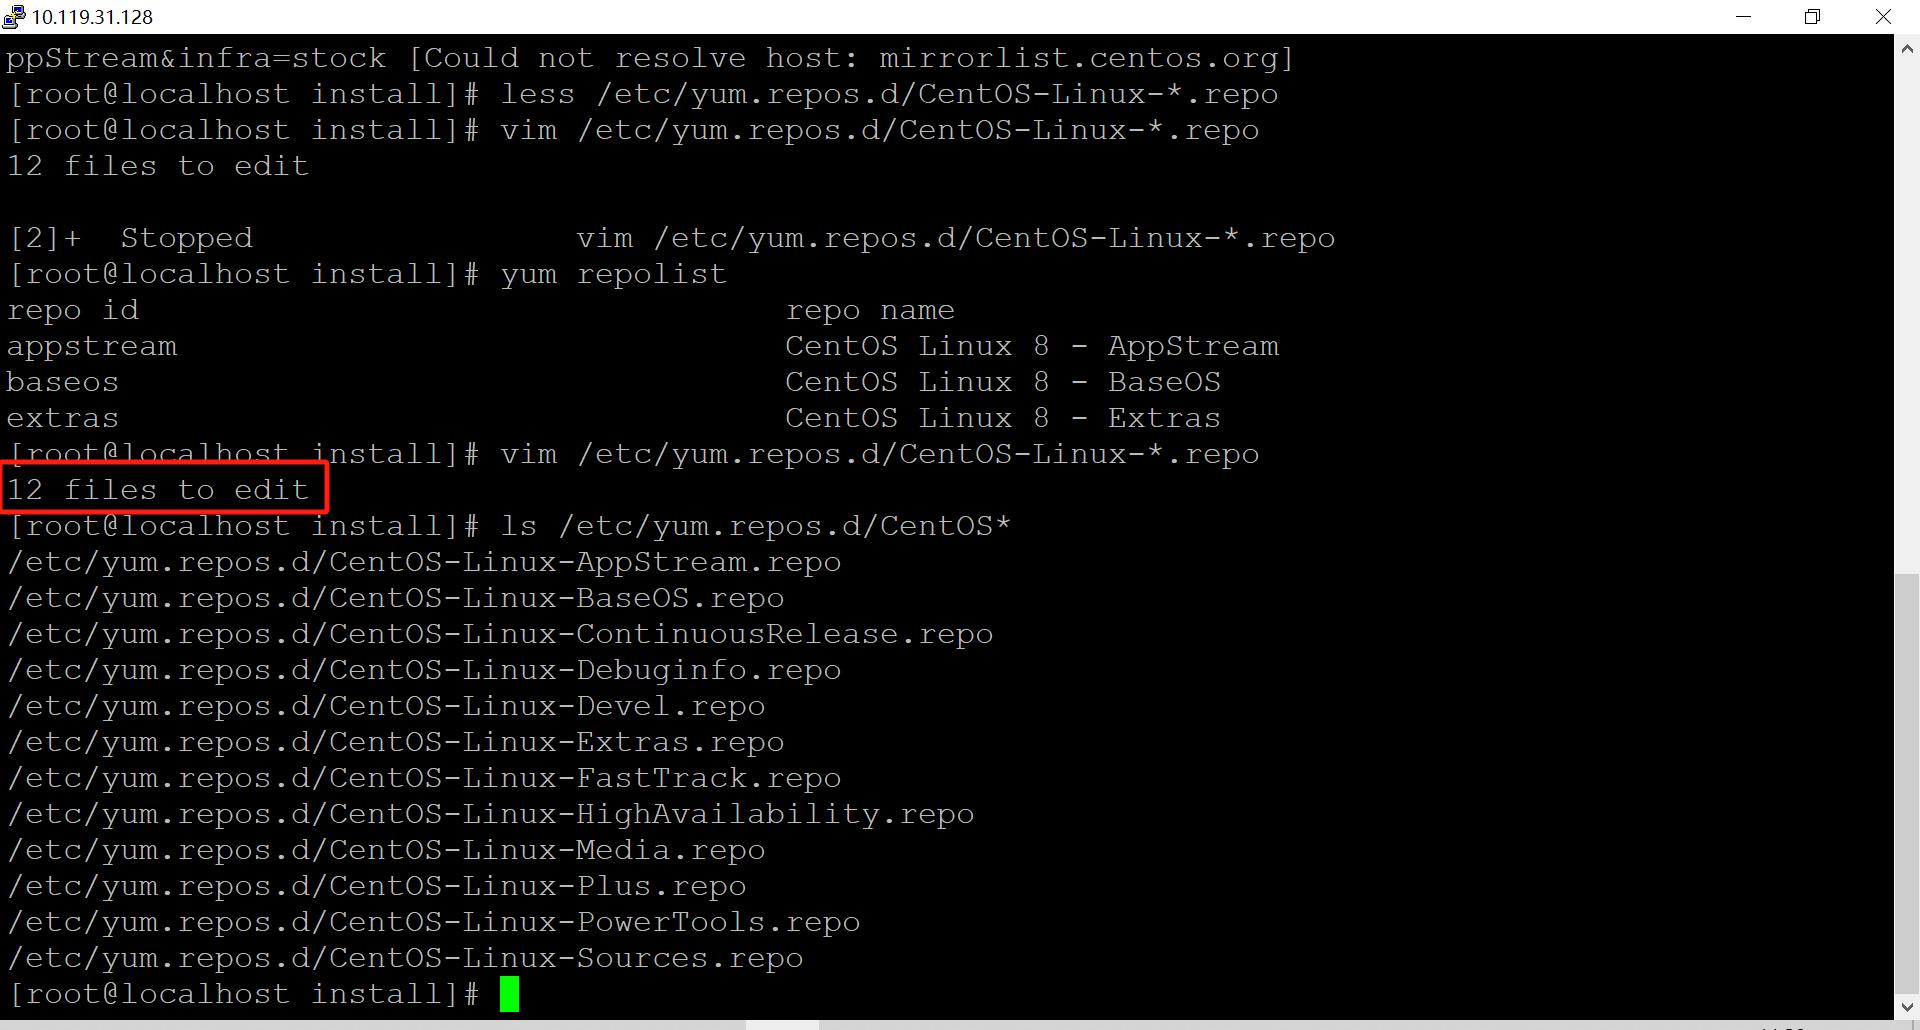
检测yum库房状态,执行:
yum repolist若AppStream等库房未启用,编辑repo文件(如
/etc/yum.repos.d/CentOS-Linux-AppStream.repo),确保enabled=1。
参考AI提供的指引,更改
/etc/yum.repos.d/CentOS-Linux-*.repo
源文件内容:
# CentOS-Linux-AppStream.repo
#
# The mirrorlist system uses the connecting IP address of the client and the
# update status of each mirror to pick current mirrors that are geographically
# close to the client.  You should use this for CentOS updates unless you are
# manually picking other mirrors.
#
# If the mirrorlist does not work for you, you can try the commented out
# baseurl line instead.
[appstream]
name=CentOS Linux $releasever - AppStream
mirrorlist=http://mirrorlist.centos.org/?release=$releasever&arch=$basearch&repo=AppStream&infra=$infra
#baseurl=http://mirror.centos.org/$contentdir/$releasever/AppStream/$basearch/os/
gpgcheck=1
enabled=1
gpgkey=file:///etc/pki/rpm-gpg/RPM-GPG-KEY-centosofficial
更改后:
# CentOS-Linux-AppStream.repo
#
# The mirrorlist system uses the connecting IP address of the client and the
# update status of each mirror to pick current mirrors that are geographically
# close to the client.  You should use this for CentOS updates unless you are
# manually picking other mirrors.
#
# If the mirrorlist does not work for you, you can try the commented out
# baseurl line instead.
[appstream]
name=CentOS Linux $releasever - AppStream
mirrorlist=http://vault.centos.org/8-stream/AppStream/$basearch/os/
#baseurl=http://vault.centos.org/8-stream/AppStream/$basearch/os/
#baseurl=http://mirror.centos.org/$contentdir/$releasever/AppStream/$basearch/os/
gpgcheck=1
enabled=1
gpgkey=file:///etc/pki/rpm-gpg/RPM-GPG-KEY-centosofficial
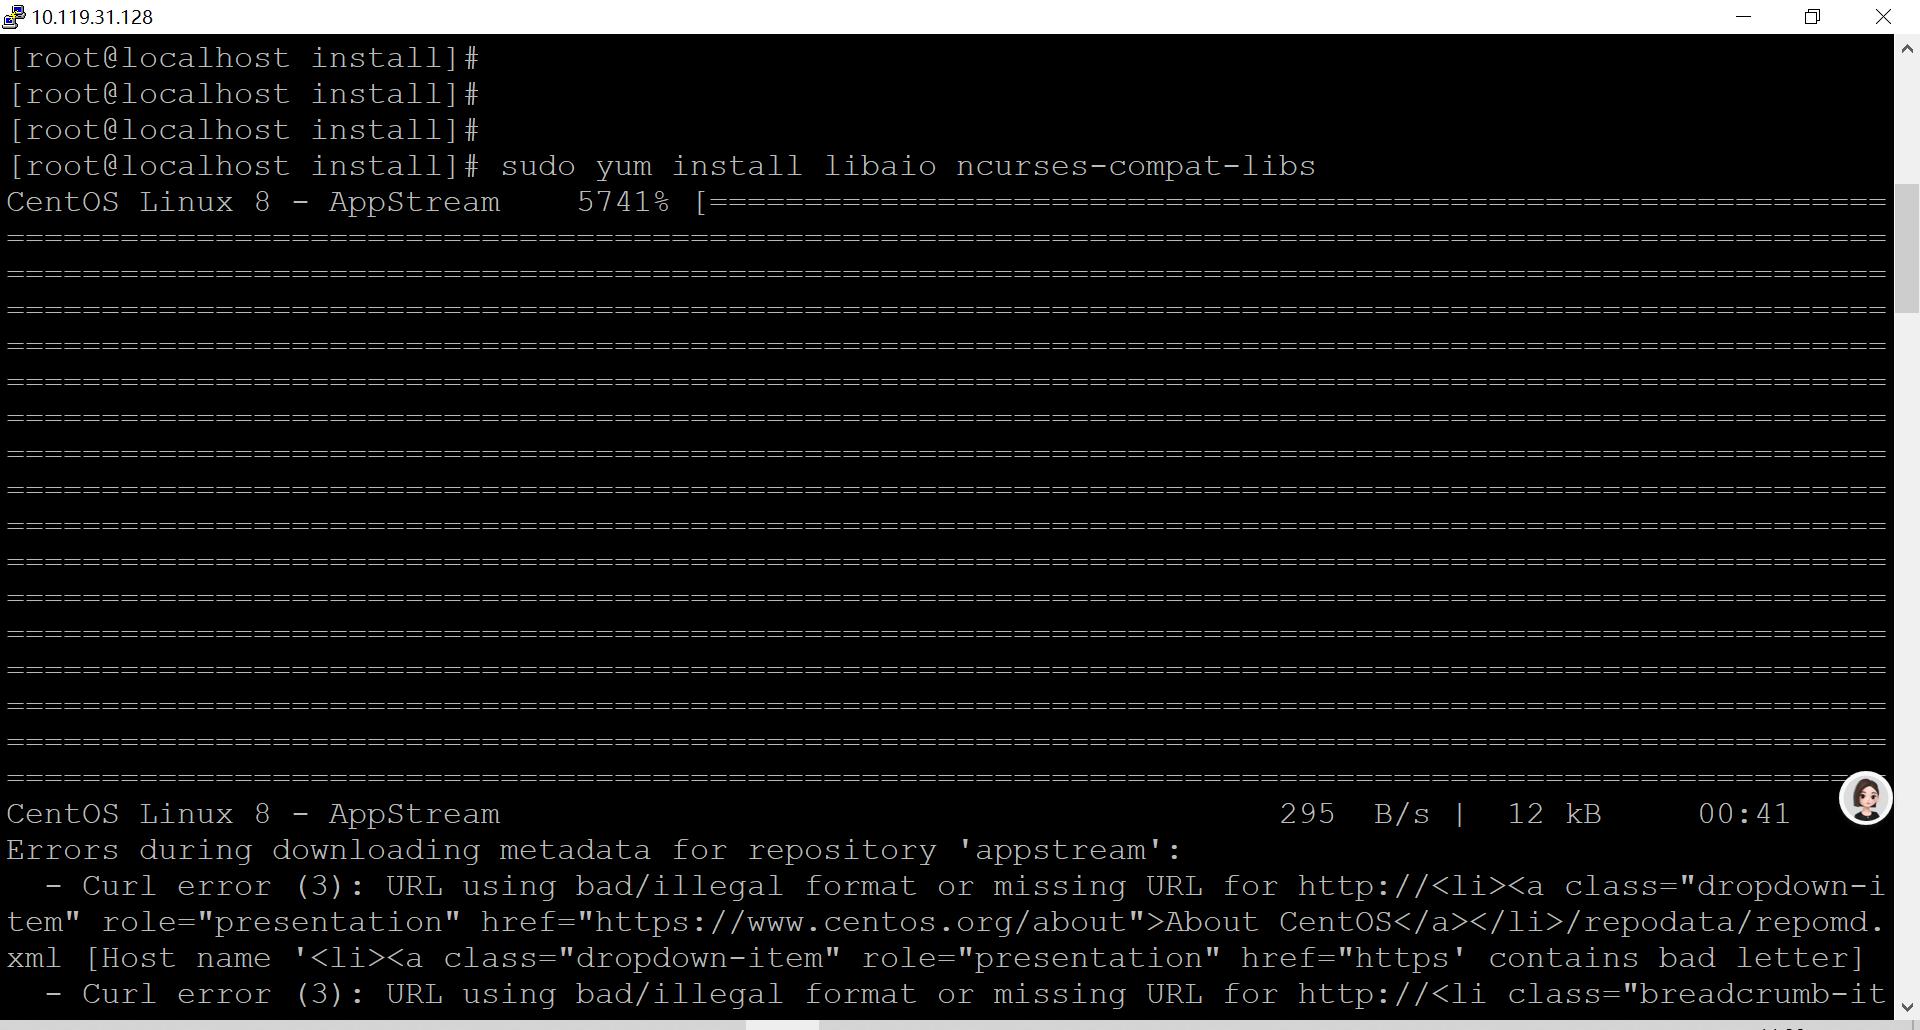
还是安装失败,
先不考虑,先尝试后续的mysql安装
四、解压并安装
解压文件
将下载的
mysql-8.0.22-linux-x64.tar解压到/usr/local/mysql:
tar -zxvf mysql-8.0.22-linux-x64.tar.gz -C /usr/local/mysql --strip-components=1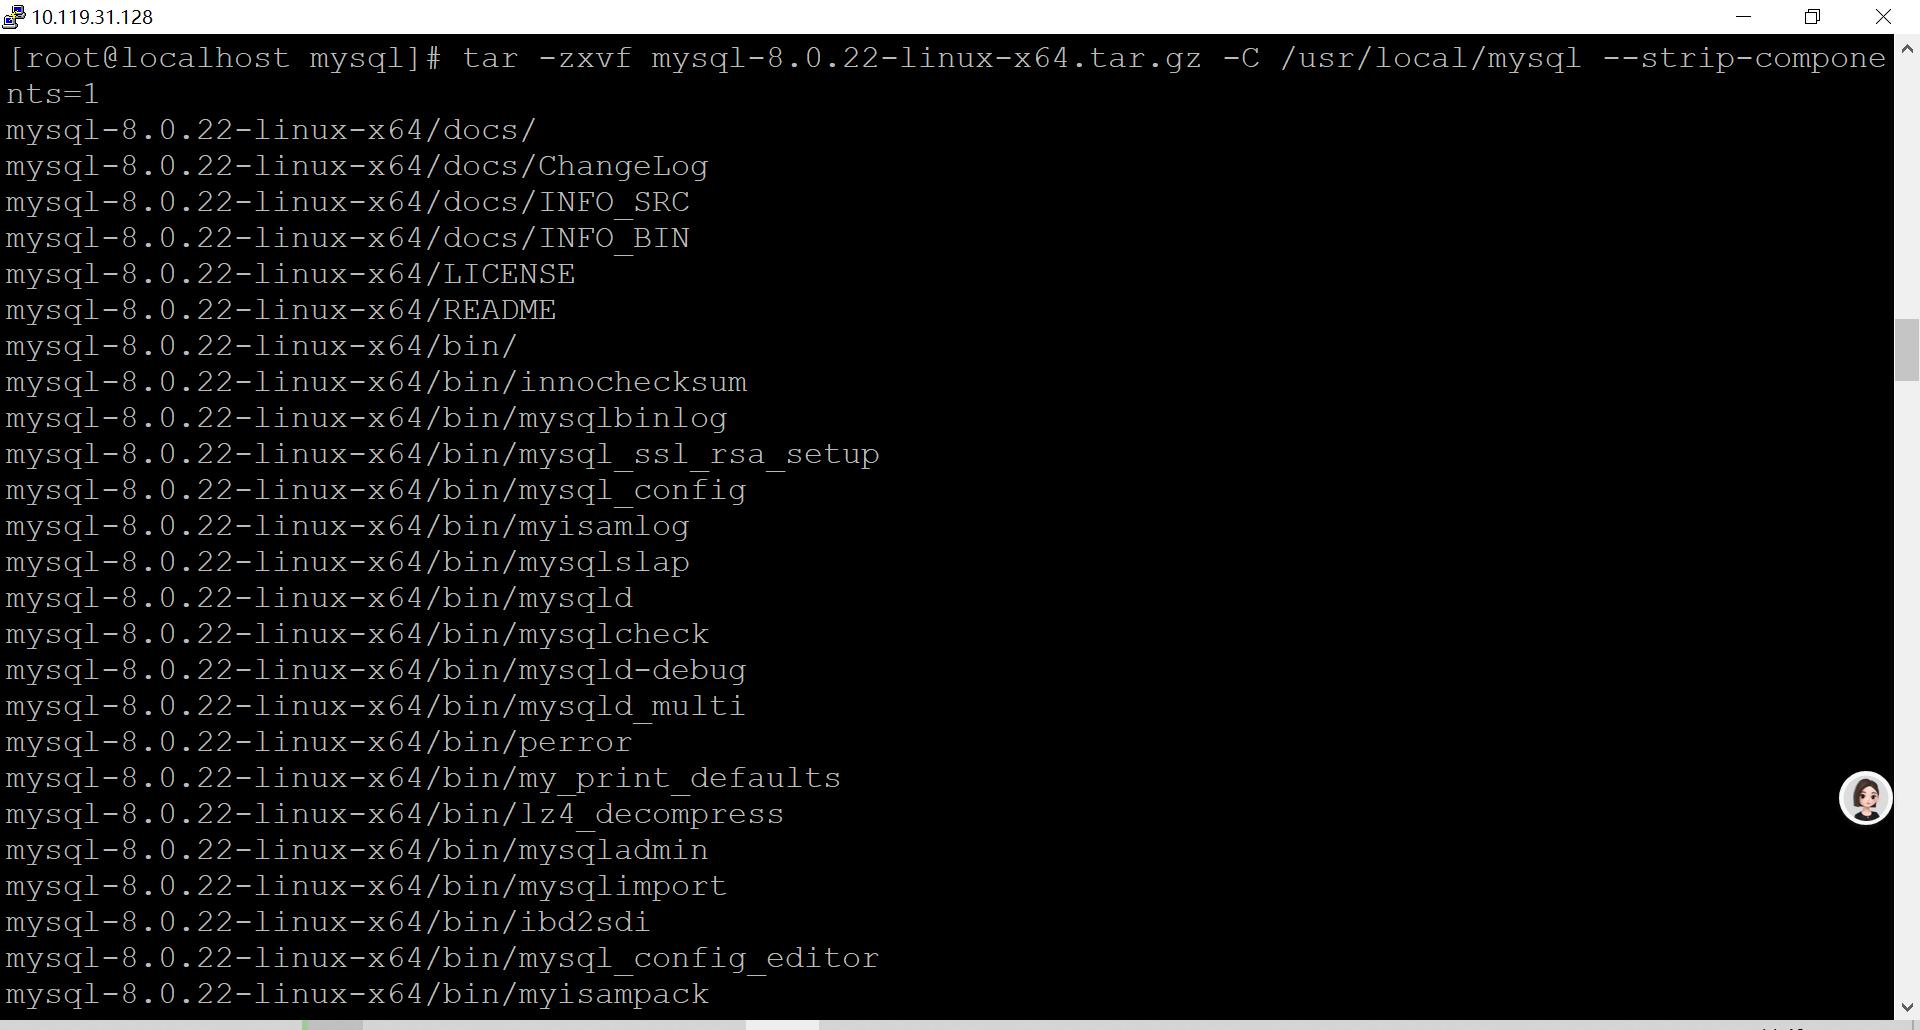
五、设置文件权限
sudo chown -R mysql:mysql /usr/local/mysql六、初始化MySQL
创建数据目录
sudo mkdir -p /var/lib/mysql
sudo chown mysql:mysql /var/lib/mysql
初始化数据库
cd /usr/local/mysql
sudo bin/mysqld --initialize --user=mysql --basedir=/usr/local/mysql --datadir=/var/lib/mysql
Atemporarypasswordisgeneratedforroot@localhost:S%,WNJXxq6lm
[root@localhost mysql]# sudo bin/mysqld --initialize --user=mysql --basedir=/usr/local/mysql --datadir=/var/lib/mysql
2025-06-22T03:53:01.989921Z 0 [System] [MY-013169] [Server] /usr/local/mysql/bin/mysqld (mysqld 8.0.22) initializing of server in progress as process 3120
2025-06-22T03:53:02.001421Z 1 [System] [MY-013576] [InnoDB] InnoDB initialization has started.
2025-06-22T03:53:03.306875Z 1 [System] [MY-013577] [InnoDB] InnoDB initialization has ended.
2025-06-22T03:53:04.643453Z 6 [Note] [MY-010454] [Server] A temporary password is generated for root@localhost: S%,WNJXxq6lm

配置MySQL服务
创建配置文件
sudo nano /etc/my.cnf添加以下配置内容:
[mysqld]
basedir = /usr/local/mysql
datadir = /var/lib/mysql
socket = /var/lib/mysql/mysql.sock
port = 3306

character-set-server = utf8mb4
default_authentication_plugin = mysql_native_password
[client]
socket = /var/lib/mysql/mysql.sock
创建服务启动脚本
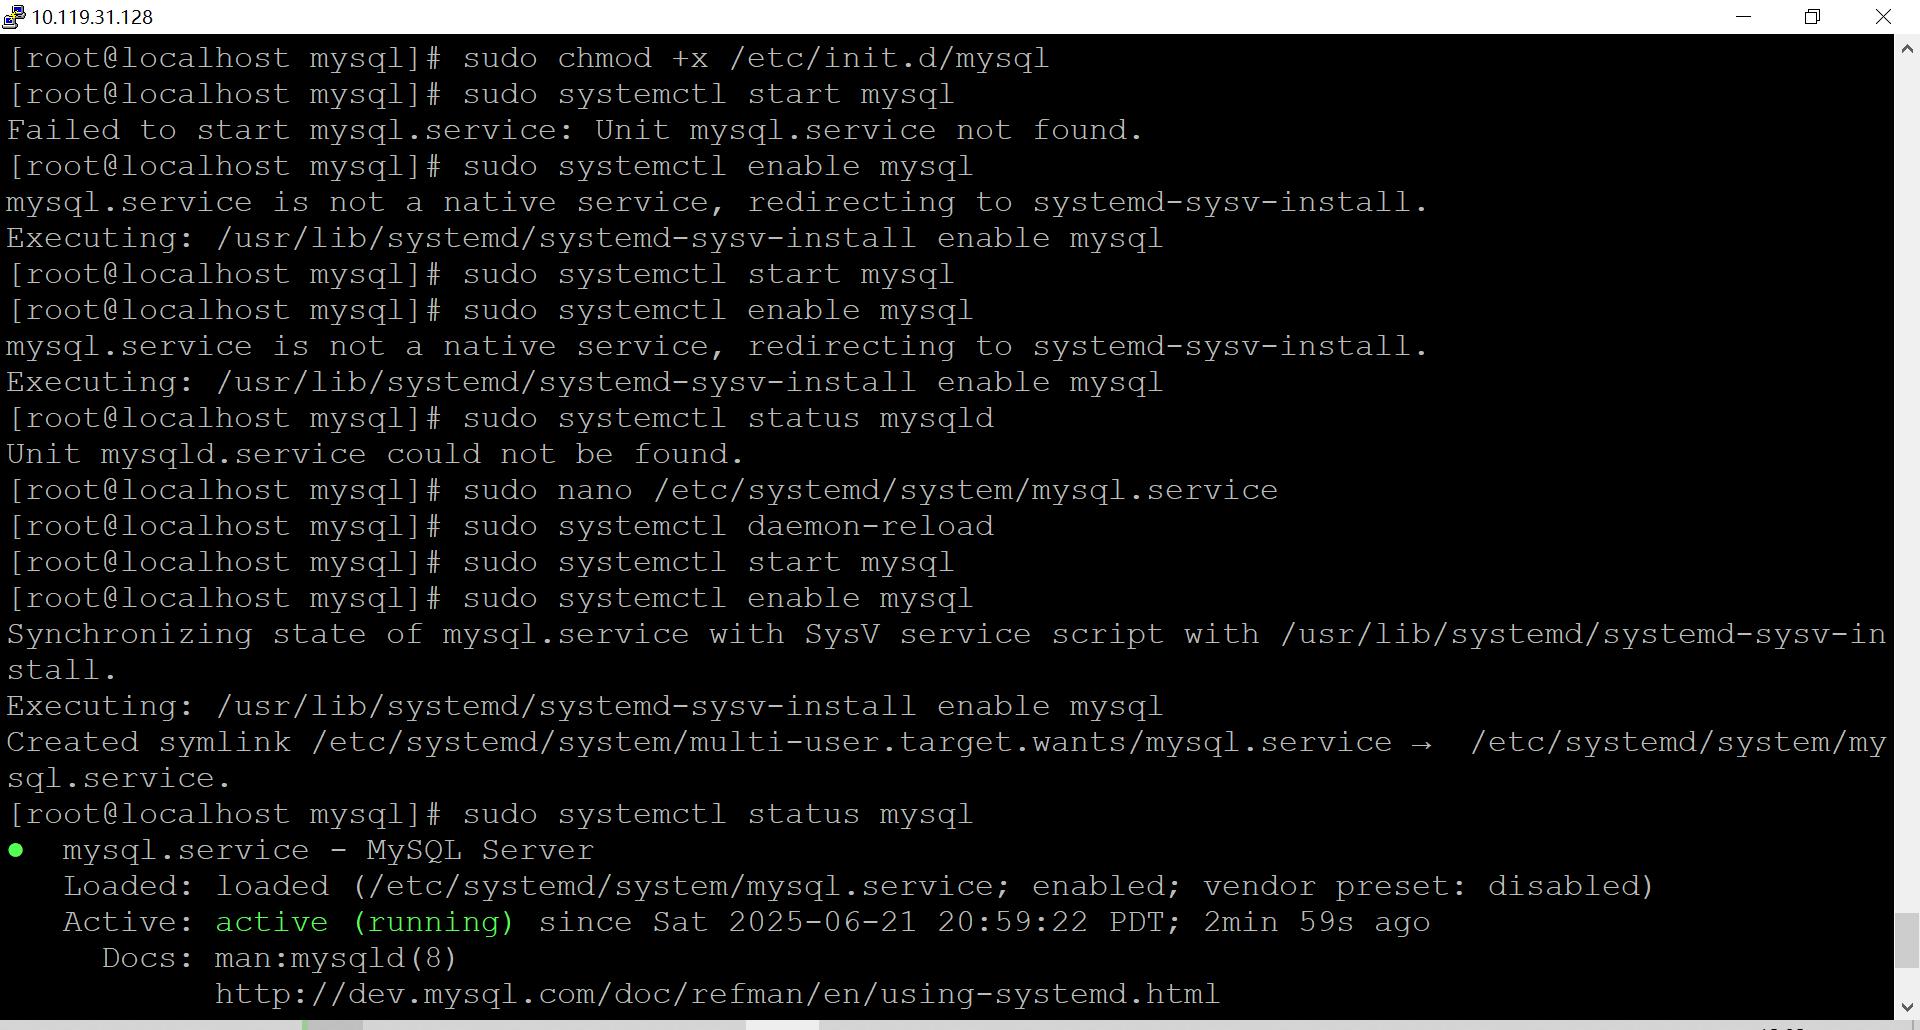
sudo cp /usr/local/mysql/support-files/mysql.server /etc/init.d/mysql
sudo chmod +x /etc/init.d/mysql
启动MySQL服务
sudo systemctl start mysql  # 或者使用 sudo service mysql start
sudo systemctl enable mysql  # 设置开机自启
失败了:
[root@localhost mysql]# sudo systemctl start mysql
Failed to start mysql.service: Unit mysql.service not found.
[root@localhost mysql]# sudo systemctl enable mysql
mysql.service is not a native service, redirecting to systemd-sysv-install.
Executing: /usr/lib/systemd/systemd-sysv-install enable mysql
[root@localhost mysql]# sudo systemctl start mysql
[root@localhost mysql]# sudo systemctl enable mysql
mysql.service is not a native service, redirecting to systemd-sysv-install.
Executing: /usr/lib/systemd/systemd-sysv-install enable mysql
问题剖析
你遇见的错误表明MySQL服务没有以systemd原生服务单元的方式正确安装。在Linux系统中,服务启动有两种常见形式:
systemd原生服务(.service文件):现代Linux发行版(如RockyLinux)的标准形式SysVinit脚本(传统方法,通过/etc/init.d/目录下的脚本)
你的系统虽然没有找到mysql.service文件,因而转向了SysVinit兼容层处理。
解决方案1.检测MySQL服务状态
bash
sudo systemctl status mysqld # 尝试使用 mysqld(官方命名)
假如依然失败,说明服务单元文件可能未正确安装。
2.自动创建systemd服务单元
创建
/etc/systemd/system/mysql.service文件:
bash
sudo nano /etc/systemd/system/mysql.service
添加以下内容(按照你的MySQL安装路径调整):
[Unit]
Description=MySQL Server
Documentation=man:mysqld(8)
Documentation=http://dev.mysql.com/doc/refman/en/using-systemd.html
After=network.target
After=syslog.target
[Service]
Type=exec
PIDFile=/var/run/mysqld/mysqld.pid
ExecStart=/usr/local/mysql/bin/mysqld --defaults-file=/etc/my.cnf
ExecReload=/bin/kill -HUP $MAINPID
LimitNOFILE = 10000
[Install]
WantedBy=multi-user.target
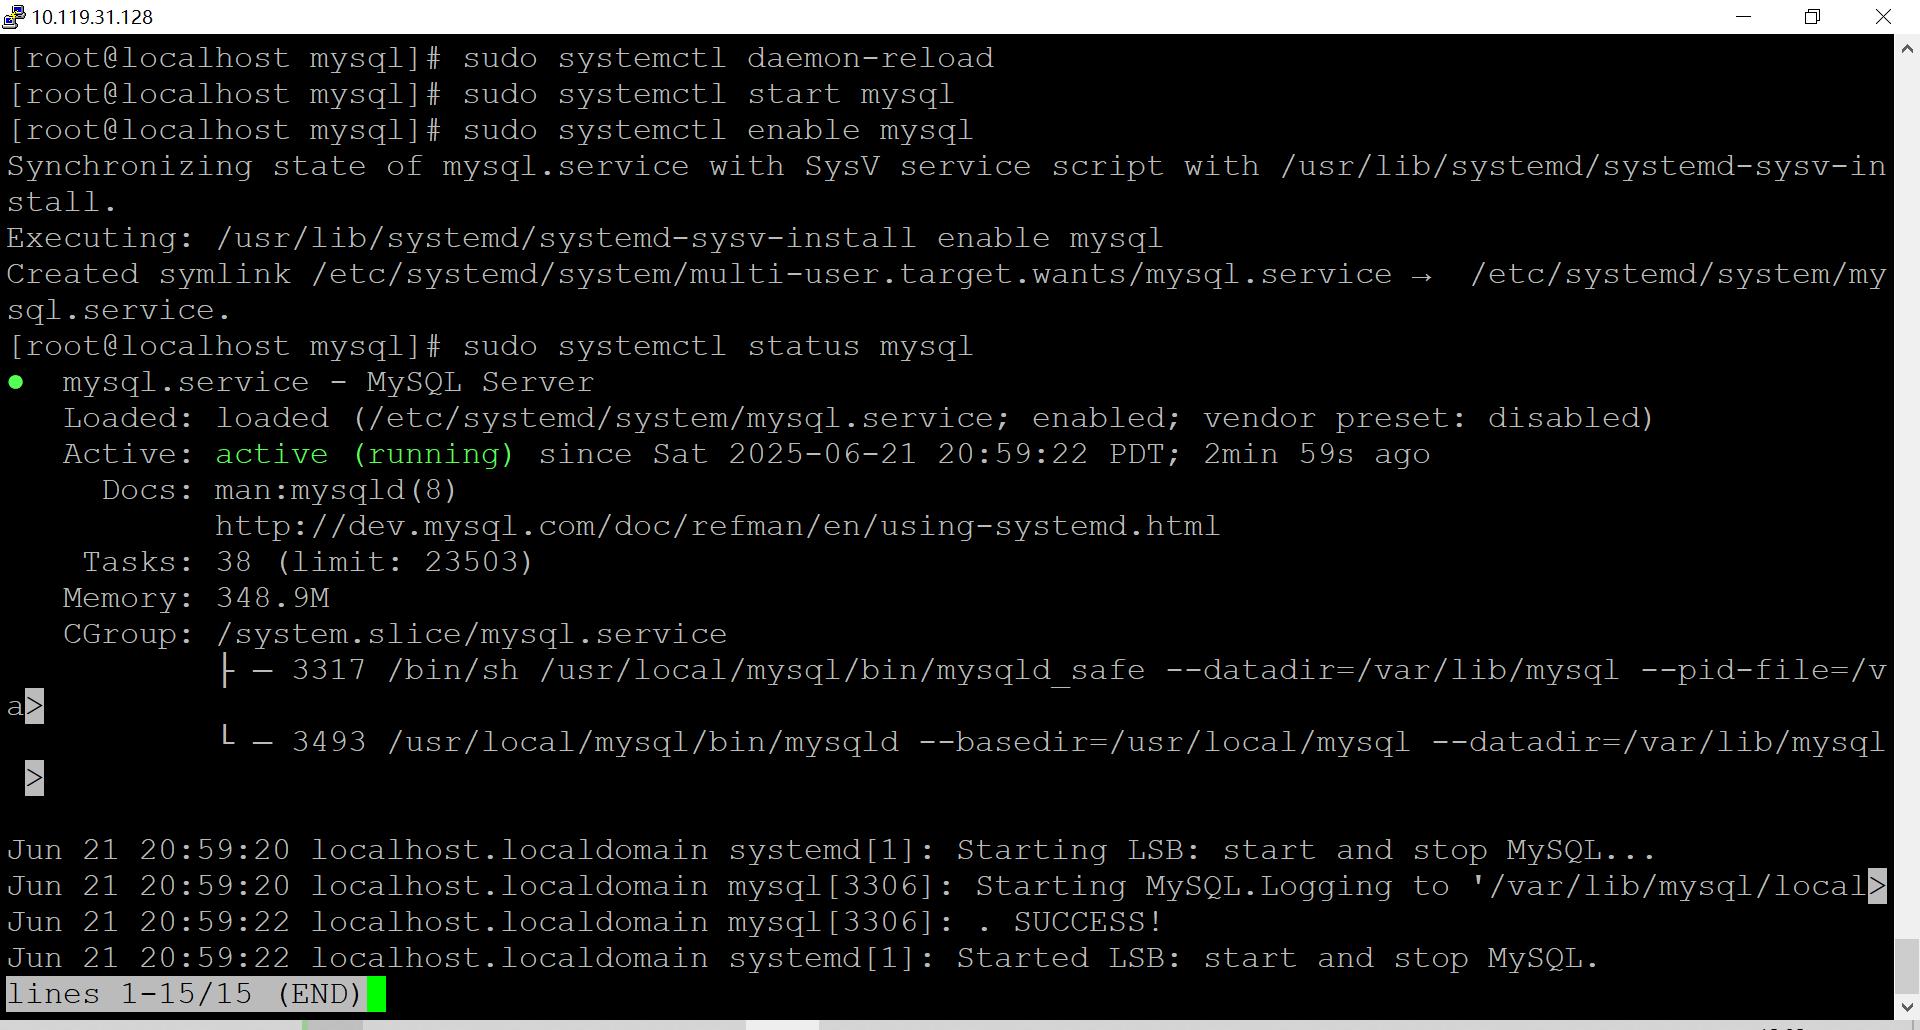
3.重新加载systemd并启动服务
bash
sudo systemctl daemon-reload  # 重新加载服务配置
sudo systemctl start mysql    # 启动 MySQL
sudo systemctl enable mysql   # 设置开机自启
4.验证服务状态
bash
sudo systemctl status mysql
假如见到active(running)说明服务已成功启动。
安全配置与验证
