命令查找
Linux下一切皆文件!which命令:找出命令的绝对路径whereis命令:找出命令的路径以及文档指南信息
[root@localhost ~]# which mkdir
/usr/bin/mkdir
[root@localhost ~]# whereis mkdir
mkdir: /usr/bin/mkdir /usr/share/man/man1/mkdir.1.gz /usr/share/man/man1p/mkdir.1p.gz
/usr/share/man/man2/mkdir.2.gz /usr/share/man/man3p/mkdir.3p.gz
文件查找(find)
find命令:精确查找,c盘搜索linux设置默认网关,IO读写,cpu开支大
# 查找 /位置 根据名称查询 文件名以ifcf开始 find / -name ifcf* /etc/sysconfig/network-scripts/ifcfg-ens33#网卡配置文件
用法1:找下来输出到屏幕
依据需求查找下来直接输出到屏幕find查找路径选项关键字
常见选项涵义备注
-name
根据文件名查找文件
-iname
根据文件名忽视大小写查找
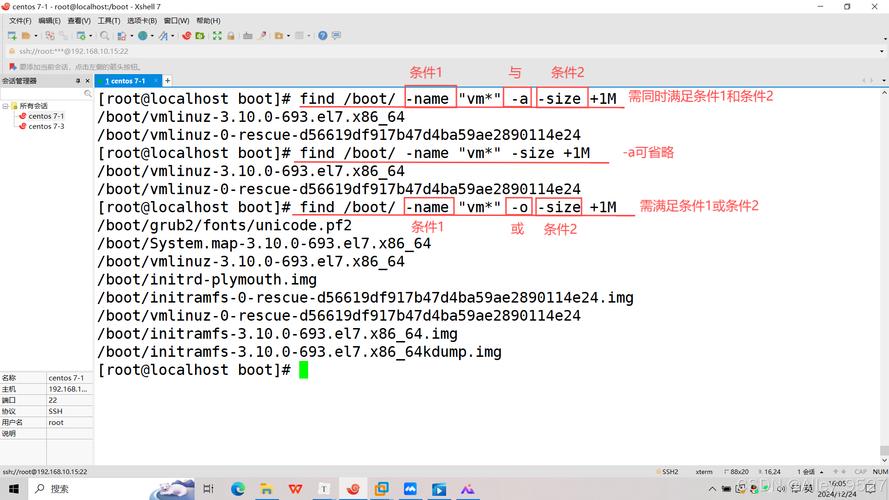
-size
根据文件大小来查找
+1M小于1M-1M大于1M1M等于1M
-type
根据文件类型来查找
-mtime
按文件更改时间来查找文件
-n指n天以内,+n指n天曾经
-atime
按文件访问时间来查
-ctime
按文件创建时间来查找文件
-perm
根据文件权限来查找文件
find / -name if*ens33
举例说明:
0)环境准备
# mkdir /test
# touch /test/file1
# touch /test/FILE1
# cp -a /home/zking/* /test/
1)根据文件名查找
[root@localhost ~]# find /test -name "file1"
[root@localhost ~]# find /test -iname "file1"
[root@localhost ~]# find /etc -name "*.conf"
2)根据文件类型查找
[root@localhost ~]# find /usr/bin/ -type l
[root@localhost ~]# find /dev -type b
[root@localhost ~]# cd /test
[root@localhost test]# find . -type d
[root@localhost test]# find . -type f
3)根据文件大小查找
[root@localhost test]# find . -type f -size +1M
[root@localhost test]# find . -type f -size -1M
[root@localhost test]# find . -type f -size -1024k
[root@localhost test]# find . -type f -size 9M
4)根据文件属性(权限,创建者和所属组)
[root@localhost test]# find . -user zking -group zking -type f
[root@localhost test]# find . -type f -perm 644
-mtime选项举例:
[root@localhost test]# find ./ -type f -mtime +2
[root@localhost test]# find ./ -type f -mtime -2
[root@localhost test]# find ./ -type f -mtime 2
课堂练习:
删掉tmp目录里的所有内容并创建以当前日期命名的目录和三个文件file1~file3
find命令找出/etc目录下大小小于1M的文件(普通文件)
find命令找出/tmp目录里所有的目录用法2:找下来执行命令按照需求查找下来后执行某个动作(命令)find路径选项关键字动作
用法2:找下来执行命令
依据需求查找下来后执行某个动作(命令)find路径选项关键字动作
常见动作说明
-exec
对查找到的文件直接执行该参数后的shell命令
-ok
对查找到的文件寻问式执行该参数后的shell命令
-delete
删掉查找到的文件
-ls
列举查找到的文件,详尽信息
复印出查找到的文件(默认选项)
举例说明:
语法结构:
注意:
1. -exec或者-ok后面写完命令必须以空格反斜杠;结尾( ;)
2. {}表示find命令所找出来的内容
Linux下文件压缩工具常见的压缩与解压缩工具压缩工具说明解压缩工具
zip
兼容类unix与windows,可以压缩多个文件或目录
unzip
gzip
压缩单个文件,压缩率相对低,cpu开支相对低
gunzip
bzip2
压缩单个文件,压缩率相对高,cpu开支相对高
bunzip2
xz
压缩单个文件linux 查找文件命令linux手机,压缩率高,压缩时间相对长linux 查找文件命令,解压速率快,cpu开支高
unxz
#查询unzip
yum search unzip
#安装unzip
yum install -y unzip
#查询rz
yum search rz
#安装lrzsz
yum install -y lrzsz
工具的用法zip工具
压缩:
zip 压缩后的文件 需要压缩的文件
选项:
-r 递归压缩,压缩目录
注意:zip压缩默认压缩后的格式就是.zip;当然也可以加后缀.zip,一般都加上
解压缩:
-d 指定解压缩路径
gzip工具
压缩:
gzip 需要压缩的单个文件
选项:
-d 解压缩
-r 递归压缩(目录)
解压缩:
gunzip 需要解压的文件
或者
gzip -d 需要解压的文件
gunzip file* 一次解压多个文件,*代表通配符;file*表示以file开头所有文件
bzip2工具
压缩:
bzip2 需要压缩的文件
选项:
-d	解压缩
xz工具
选项:
-z 压缩,默认
-d 解压缩 或者 unxz
压缩:
xz 文件名
解压缩:
unxz 文件名
或者
xz -d 文件名
课堂练习:
在/tmp目录里创建dir3目录
将/tmp/dir1目录里的所有文件使用gzip工具压缩
将里面使用gzip工具压缩后的文件使用bzip2工具再度压缩
将/etc/hosts文件和/etc/inittab文件拷贝到/tmp/dir3目录里
使用xz工具将/dir3目录里的所有文件压缩
使用zip工具将刚才所压缩的所有文件压缩成一个文件而且保存到/home目录里叫yasuo.zip
将以上所有的压缩文件解压
Linux下文件打包工具
tar命令:可以将多个文件打包成一个而且压缩,不会改变文件的属性,很常用。用法:tar选项打包后的文件须要打包的文件
#1.将当前文件夹中的所有内容打包到s2.tar.gz  使用gzip工具
tar -zcvf s2.tar.gz .
z:使用gzip工具压缩
c: 打包
v: 显示详细
f: 指定包名
#2.将当前文件夹中的所有内容打包到s2.tar
tar -cvf s2.tar .
#3.将s2.tar.gz文件解压到y1文件夹 使用gzip工具
tar -zxvf s2.tar.gz -C y1
#4.将s2.tar文件解压到y1文件夹
tar -xvf s2.tar -C y1
常用选项说明
-c
创建tar包(打包)
-z
调用gzip工具压缩
-j
调用bzip2工具压缩
-J
调用xz工具压缩
-v
显示详尽信息
-f
指定包名
-x
解压
-C
指定解压路径
-t
列举或查看tar包内容
-r
往tar包里追加文件
注意说明:
以上选项上面的横杠”-“可以省略
假如早已将文件压缩打包,这么就不能追加;假如只是打包就可以追加。
参数次序须要注意,最好把-f参数放在所有参数前面。
当出现以下提示时,加一个大P参数解决。tar:Removingleading`/'frommembernames
举例说明
1. 将/tmp目录里的dir1目录和/etc/hosts文件打包到/tmp/dir4里叫dabao.tar
[root@localhost tmp]# tar -cvf /tmp/dir4/dabao.tar ./dir1 /etc/hosts
./dir1/
./dir1/test1.gz.bz2
./dir1/aaa/
./dir1/aaa/file2.gz
./dir1/file1.gz.bz2
tar: Removing leading `/' from member names
/etc/hosts
注意:以上错误提示可以忽略
查看打包后的文件内容:
[root@localhost tmp]# tar -tf dir4/dabao.tar
./dir1/
./dir1/test1.gz.bz2
./dir1/aaa/
./dir1/aaa/file2.gz
./dir1/file1.gz.bz2
etc/hosts
2. 将/boot目录和/root/install.log文件打包并压缩到/tmp目录下叫backup_boot.tar.gz
[root@localhost ~]# tar -cvzf /tmp/backup_boot.tar.gz /boot install.log
3. 解压tar包
[root@localhost tmp]# tar -xf backup_boot.tar.gz 解压到当前路径
[root@localhost tmp]# tar -xf backup_boot.tar.gz -C dir1/ 解压到指定路径
课堂练习:
在/tmp目录里创建backup目录
使用tar工具将/boot目录和/tmp/dir1/以及/etc/hosts文件打包并压缩到/tmp/backup/test.tar.xz
将刚才打包压缩的文件解压到/home/20190303目录里
扩充补充
日期相关指令
date命令(重点)

date:复印或则设置当前系统日期和时间date--help自己先求帮助①打印日期或时间
打印系统当前日期或时间
[root@localhost ~]# date
[root@localhost ~]# date +%D
[root@localhost ~]# date +%F
[root@localhost ~]# date +%Y-%m-%d
[root@localhost ~]# date +%T
[root@localhost ~]# date +%X
[root@localhost ~]# date +'%F %X'
[root@localhost ~]# date +%c
打印系统非当前日期或时间
[root@localhost ~]# date -d '+3days' +%F
[root@localhost ~]# date -d '-3days' +%F
[root@localhost ~]# date -d '3days' +%F
[root@localhost ~]# date -d '3days ago' +%F
[root@localhost ~]# date --date='30days' +%F
②设置系统日期或时间
选项:-s 设置当前系统时间,只有root权限才能设置,其他只能查看。
date -s 20200523 设置成20100523,这样会
把具体时间设置成空00:00:00
date -s "01:01:01 2020-05-2" 这样可以设置全部时间
date -s "01:01:01 20200523" 这样可以设置全部时间
date -s "2020-05-23 01:01:01" 这样可以设置全部时间
date -s "20200523 01:01:01" 这样可以设置全部时间
③系统时间同步硬件时间
hwclock:查看而且设置硬件时间
选项:
-s, --hctosys set the system time from the RTC
-w, --systohc set the RTC from the system time
-l, --localtime the RTC timescale is Local
举例说明:
[root@localhost ~]# hwclock --hctosys
[root@localhost ~]# hwclock
2019-06-23 18:44:10.377920+08:00
[root@localhost ~]# date
2019年 06月 23日 星期日 18:44:21 CST
[root@localhost ~]# date -s "20221010 12:12:12"
2022年 10月 10日 星期一 12:12:12 CST
[root@localhost ~]# date
2022年 10月 10日 星期一 12:12:14 CST
[root@localhost ~]# hwclock
2019-06-23 18:45:01.368135+08:00
[root@localhost ~]# hwclock --systohc
[root@localhost ~]# hwclock
2022-10-10 12:12:43.179274+08:00
timedatectl -h 设置和查看系统的时间和日期(设置时区以及开启或关闭ntp服务)
④应用案例有时侯我们须要用到当前的系统时间,怎么调用?例如以当前系统日期命名创建目录或文件
2020-10-10.log.tar.gz
2020-10-11.log.tar.gz
$():括号里面的命令优先执行 date +%F 2019-06-23
创建目录和文件,以当前系统日期命名
[root@localhost ~]# mkdir $(date +%F)
[root@localhost ~]# touch $(date -d '+3days' +%Y%m%d).log
cal命令
cal:查看月历
cal 或者 cal -1 表示直接输出当前月份的日历
cal -3 表示输出上一个月+本月+下个月的日历
cal -y 年份 表示输出某一个年份的日历
